
Pear tree could be suffering from fireblight


Alot of fruit trees were purchased this past weekend. Make sure you have staked them so the trunk cannot move. They will do better in wood mulch, 3 to 4 inches deep but keeping the mulch 6 inches away from the trunk.
You must spray your vegetables for aphid control. If you have not been doing this I will guarantee the undersides and between leaves are loaded with aphids and other vermin.
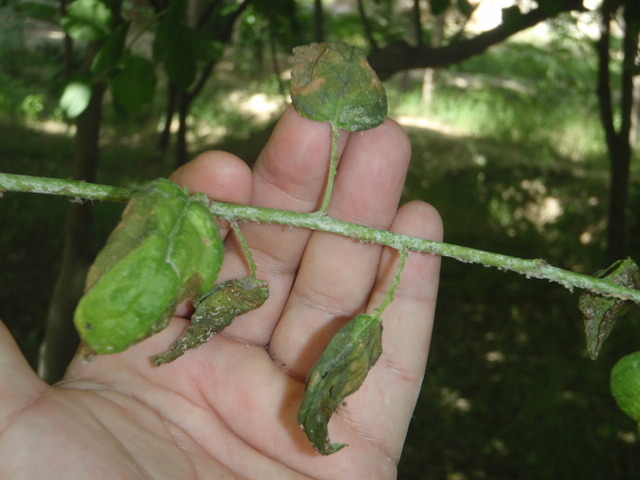
Q. I planted a 5-gallon Comice pear tree three springs ago and it seems pretty happy espaliered along my west-facing block wall. But a few new leaves on three of the branches have some kind of black rot on them. It has rotted away part of the leaf on some of them. Can you tell me what this disease is and whether and how to fight it?
A. Two things come to mind. First, last year was a pretty bad year for a disease that attacks European pears, Asian pears and apples. This is a bacterial disease called fireblight.
This disease can be devastating to those fruit trees. The disease starts near where the flowers are produced and spreads down the limb. In the case of Asian pears in our desert climate, the disease can kill that particular tree.
It normally does not do this to European pear or apple here in our climate. The disease turns these parts of the plant and even some small limbs dark black, like they were scorched with fire, hence the name.
A telltale sign is distorted, blackened growth, from the previous year, bent into a hook. If you suspect this disease, cut out the diseased portion 12 inches below the infection. Sterilize the pruning shears or saw with a strong disinfectant such as alcohol or Lysol between each cut to prevent reinfecting the tree.
Secondly, pear leaves normally turn black if they are injured in some way. That is normal color for damaged or dying or dead pear leaves. So, if only the leaves turned black then just keep an eye on its new growth from this area this spring.
Q. Over the years my garden squash bug infestations have become worse and worse. In the past I have sprayed an insecticide called Sevin and a product called Bug B Gone. It seems to help somewhat but the bugs always come back.
A. The biggest problem with squash bug control is that people don’t get on top of the problem early enough. They wait until they see squash plants, melons and pumpkins start to wilt or turn yellow before they go and investigate the problem.
Squash bugs begin to infest these types of plants when they are very young. Plants can have a large population feeding on the undersides of leaves and the plant may not show any signs of a problem.
You must turn older leaves over and inspect several of the oldest ones the week you see large leaves produced. When you see plants wilting and hundreds of them in all stages of development on the bottom of the leaves, it is too late.
Check the leaf undersides two or three times a week. Once they are spotted it is important to get rid of them by handpicking them or using a cordless vacuum if you are squeamish. Soap and water sprays will work but they must be sprayed on the undersides of the leaves, not the tops of leaves.
Insecticidal soaps are effective but the bugs must be sprayed with the soapy solution directly on them for it to work. The soap sprays do not leave enough toxic residues behind to give any long-lasting control.
Some people have reported damage to plants from soap sprays made from liquid detergents, so it is best to buy an insecticidal soap like Safers or make sure the soap you use is safe to spray on plants.
Other insecticides such as Sevin are also effective but are toxic to bees. Avoid spraying anything when plants are in flower. That can be hard to do once squash or melons start flowering. In cases like that, spray early in the morning or late evening when bees have gone home.
If you lay boards or thick cardboard in the garden, they will congregate under them and serve as a trap where you can get rid of them by hand. This does not substitute for checking under the leaves.
Melons and squash that vine can be trellised. When they are trellised they are easier to check, spray and hand pick.
Q. When is the best time of year to divide a Lily of the Nile? I have one that is about 10 years old and it isn’t looking very good.
A. The soil might be getting exhausted and that may be one reason for their appearance. They do like a fairly rich soil and if you do not apply compost to them frequently, the soil will become mineralized and their health will decline. They like organic mulches and do not like rock mulch at all.
But you are right, they should be dug up and divided about every five years and replanted.
Lily of the Nile has a bit different rhizome than some other plants. In the trades they refer to many of these root structures that need dividing as “bulbs.” But they are not true bulbs at all, so don’t go looking for the type of bulbs that onions or lilies get.
It is late spring and too late to do it now but you can divide them in early spring (February) or fall around Oct. 1 to 15. You would wet the soil and lift the plants with a shovel, but a garden spade is best. Be careful not to damage the “bulb.”
After lifting them out of the ground, wash the underground “bulb” with a strong stream of water from a hose and get the mud off.
With a sharp knife or clean pruning shears, cut them apart but you should have two or three growing points in each “bulb” that you want to replant. Wash the cuts and dust them with a fungicide such as Thiram or allow them to air dry in the shade
Replant them with the buds pointing up and about 2 inches deep in your soil amended with compost and bone meal. Replant about 18 to 24 inches apart.
Bob Morris is a horticulture expert living in Las Vegas and professor emeritus for the University of Nevada. Visit his blog at xtremehorticulture.blogspot.com. Send questions to Extremehort@aol.com.


