Chalk-based paint can change the way you look at cast-offs


Chalk painting had its first brush with design about about six years ago when its slate-look finish began showing up in novel ideas for home accents.
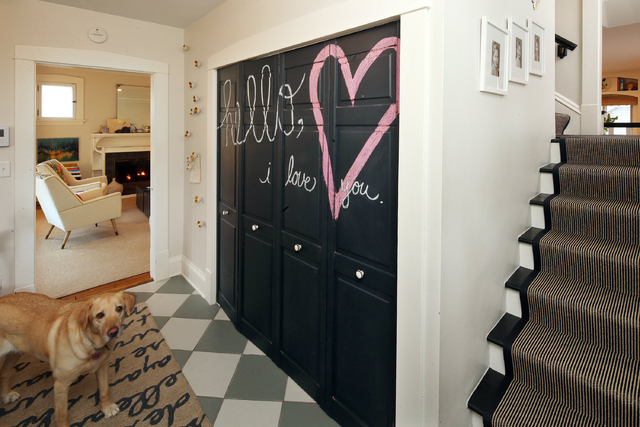
DIYers created family message boards by brushing chalkboard paint onto panels of kitchen/pantry doors or painting a section of wall, then trimming the area in wood molding to set it off. Chalk paints also went through a period where they were a favorite in children’s rooms since they made it permissible to draw on the walls.
Today’s chalk-based paints have expanded from the original black chalkboard finish into a palette of pastels, jewel tones and neutrals. Chalk painting is popular with the shabby-chic crowd because the finish can be easily distressed, but the look can be used in any decor from country to contemporary.
“I enjoy the creativity of using it; the ease of transforming a tired old piece of furniture into something new and more modern,” says Joy Chapman.
Chapman, a retired dental hygienist, and her friend of 30 years, Ann Hurley, a carpet/textile designer, teach chalk-painting classes at The Galleries on Williams in Chattanooga, Tenn. In addition to beginner and intermediate classes, they offer a “Revamp Your Lamp” class, in which participants may bring any style of lamp from home to update with chalk-based paint.
Chapman says their interest was piqued last July after seeing designer Amy Howard give a demonstration using her chalk-based paint brand at the Atlanta Merchandise Market. Howard’s design ideas have been featured by HGTV and in Southern Living and Veranda magazines. One month later, Chapman and Hurley took Howard’s two-day workshop to learn from the expert. They say they liked the variety in her color palette of paints and they appreciated that her brand was made in Tennessee.
“I have always had a love for antiques and rescuing old pieces of furniture,” says Hurley, adding that she’s updated her own home furnishings as well as flea-market finds. “You can take a piece that looks very dated and out of style and bring it up to date easily and inexpensively. And if you don’t like it — just paint it again.”
STEP 1: You’ll need one-step chalk-based paint, clear wax for sealing paint, brushes, Simple Green (or a similar degreaser) and T-shirt rags. Chalk-based paints come in a variety of prices, from $3.99 for basic black slate at Hobby Lobby up to $34 for a quart of designer brands. Chapman suggests using a flat-bristle chipping brush for painting and a round-bristle brush for applying wax.
STEP 2: Although the beauty of chalk-painting is you don’t have to strip or sand a piece before you paint, you will need to start with a clean surface. Chapman suggests using a degreaser (such as Simple Green, which can be purchased at Lowe’s, or Awesome brand at Dollar Tree) to remove any old furniture polish from the piece. Solution mix should be 75 percent water to 25 percent cleanser.
Apply solution to the cloth and rub down furniture, making sure to reach into all nooks and crannies. Then wipe off degreaser by rubbing down piece again with a damp cloth.
STEP 3: Chalk-based paint is prone to divide and settle in the can, so shake it vigorously at least one minute before opening. When opened, stir with a stir-stick several times.
“The biggest mistake beginners make is not stirring the paint enough,” says Hurley. “Stir and stir until you think it’s mixed, then stir again.”
Dip a China-bristle brush into the paint about halfway up the bristles. “Don’t load the brush to the top, just the tips, ” advises Chapman.
STEP 4: Because chalk-based paint dries quickly, paint your piece in sections using long, smooth strokes. Avoid letting paint puddle because that will result in a cracked finish when dry.
When the piece is entirely covered in one coat, allow it to dry for at least 20 minutes. The thicker the application, the longer it will take to dry. If desired, a second coat may be applied.
STEP 5: When the piece is completely dry, it may be left as is or sealed by waxing. If the piece will be used as a chalkboard, do not wax. “The benefit of waxing is that it will seal and preserve the finish,” Hurley says.
Using a round brush, dip brush tips into the clear wax, off-load the extra wax onto a piece of cardboard, then apply in long strokes.
STEP 6: After five to 10 minutes, the wax should be ready for buffing. Wax should feel slightly tacky to the touch, but it should not have any movement to it before buffing. Buff with a lint-free cloth. Hurley suggests T-shirt rags.
STEP 7: Again, because chalk-based paint dries quickly, clean paint brushes immediately in soap and water when through. Clean the wax brush in mineral spirits.