It is hard to screw up replacement of pre-hung door


Q: I bought a pre-hung door to replace the damaged door on my pantry. As I’m getting into this project, I’m having second thoughts about doing it myself and wonder if I should hire someone to do it. Can you guide me through the steps to install the new door?
A: Though I walk through the valley in the shadow of death, I fear no evil. It’s OK to be afraid. We fear what we do not understand. At least that’s what some pompous professor told me once. Because the door is pre-hung, it would be really hard to screw it up, so don’t worry.
To get started, you will need to remove the old door. Drive out the hinge pins with a small screwdriver and a hammer, and, while supporting the door, pull it off of the jamb hinges. Make the top hinge pin the last one you remove so that you can control the door if it starts to slip out of the hinges by itself.
Next, remove the door casing. Take a utility knife and cut between the door trim and the wall. This will ensure that when you pull the trim away from the wall, it won’t pull 3 inches of paint along with it.
After you make the cut, slide a flat pry bar (or a scraper) between the doorjamb and the trim and gently pry off the trim. When you remove the door casing, start about halfway down and work your way up. You probably will encounter nails in the mitered corners.
Once you have the corners free, work on removing the bottom of the trim, which probably will be wedged to the wall by the flooring. Pull the trim up as you work it free from the nails. Reusing the old trim will make the project easier, plus it will match the rest of the room’s baseboards.
Next, check that the floor is level. You can use a 24-inch level taped to a straight board to take the reading from one side jamb to the other. Measure the variance from one side to the other, and if you have to cut the side jambs, leave the low side that much longer.
Also, use a circular saw and set the blade low enough to cut both the side jamb and the stop in one pass. The door should clear the flooring by ¼ inch to ½ inch.
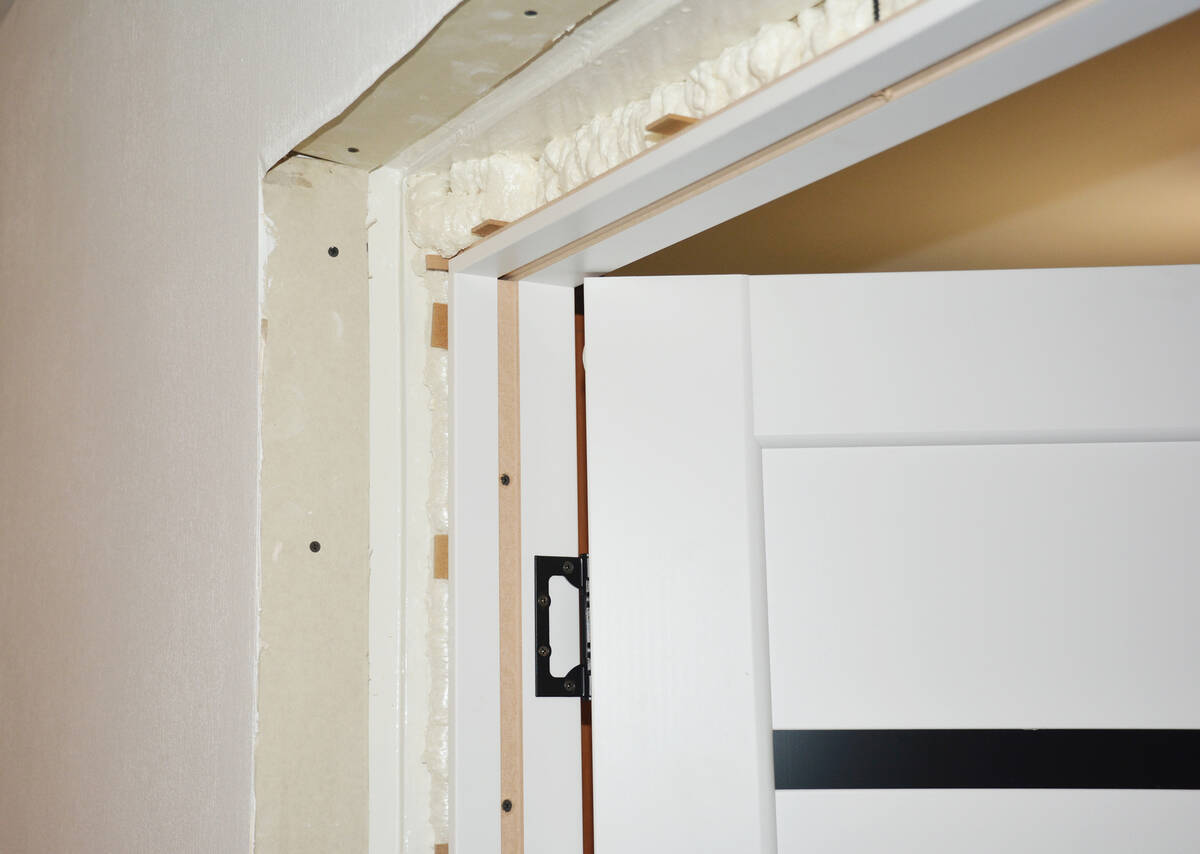
An easy way to align the new jamb with the drywall surface is to attach two small boards (1-inch by 3-inch boards are good) to the non-swing side of the jambs. Set the door in place, and position it so that the baseboards will be aligned. Use a level and add pairs of shims on each side at the top to plumb the hinge side jamb.
Predrill the holes and use 8d finish nails and hit one through the hinge side jamb, through the shims, and into the door framing. Add more shims and nails to the bottom on the hinge side, and then finally at the middle of the jamb. Check for plumb with each nail you drive.
Once you have secured the hinge side jamb in three places, make sure the top jamb is level. Adjust the shims at the top of the strike side, if necessary, and drive nails through the strike side jamb and shims.
You can now remove the alignment boards from the jambs, as well as the temporary plug that the manufacturer installs into the strike hole to keep the door correctly aligned.
Continue to shim the strike side jamb in four places: the top, bottom, and above and below the strike. As you shim the jamb, make sure it is perpendicular to the door. If it’s not, you can adjust the shims to make sure it is.
Drive two nails wherever you have shims, on either side of the stop. Use a nail set (about $5) to sink the nail heads slightly below the surface, and then cut off the shims so that they are flush with the jamb.
The only thing left to do is to install the lockset/handle and reinstall the door trim. Again, use a nail set and sink the nail heads slightly below the surface. Use wood putty to fill the holes, and then touch up the paint, or stain and varnish.
Mike Klimek is a licensed contractor and owner of Las Vegas Handyman. Questions may be sent by email to handymanoflasvegas@msn.com. Or, mail to 4710 W. Dewey Drive, No. 100, Las Vegas, NV 89118. His web address is www.handymanoflasvegas.com.
Do-it-yourself
Project: Install a pre-hung door
Cost: From about $200
Time: About 4 hours
Difficulty: ★★★★